Hello Folks of the Mortal Realms and Seasons Greetings to you all.
We are back yet again, this time for my Part 2 of 3D Printing. In this Ep I will be going over PLA/Filament Printing in more detail then in my previous blog. Whilst I won't be treating this like an instructional guide. I will be taking you all on a journey through a terrain Print. Starting from sourcing the files, taking it through the slicing software, then move to the printer and turn our file into our brand new fancy product.
To recap on last time. PLA/Filament printing is essentially the melting of plastic wire and injecting that molten plastic via a very small nozzle at the end of a motorised print head that can move along the X, Y and Z Axis. It builds your model by drawing lines of the melted plastic over and over slowly working its way upwards (Z axis), rapidly cooling into hardened plastic


This style of printing I've found over the last 12 months to be a much easier way to get into 3D printing then Resin printing, although it is much less suited to printing models of the scale we would typical worth with, so finds its home working with terrain or larger scale objects with less required detail.
Project: City of Firwood - Weapons Shop
Step 1. Finding a file/project
So first part of any 3d print project is working out what we want to print. Typically I start off by going to a range of websites such as www.myminifactory.com , www.thingiverse.com , or even just searching google and it'll link you to one of the many websites offering something you'll hopefully like. These websites often offer a range of Free as well as paid premium objects, along with a series of "collections" which bundle a series of products from a single designer together. The files we are looking for are known as .stl files. If I was to google search. Id just type in "Ruined Building STL" and plenty of websites will have something to offer.
Early on in my printing journey I found a kickstarter called the "City of Firwood", I was fairly late to the party so most of the items were already long released, but they are still available on Myminifactory. The purchase was made and many many gigabytes of files were downloaded.
Picture of some of the pieces of the set below. I've done a few from this set now and it's been a brilliant purchase. That one on the top right is our selection for today. The weapons shop.

Step 2. Slicing
So now we've found our file its time to take it to the Slicer. For my PLA Printer I use Cura which is a free program you can download from their website https://ultimaker.com/software/ultimaker-cura Its a fairly commonly used program by many people and as such there is a tonne of guides/help out there on the internet (A common theme around my printing choices)
This is probably 1 of the 2 most importants part of the process as you are essentially setting up the instructions the printer will use to create your product.
Before we throw on the Weapons Shop, Lets have a quick look at something more basic. This one is a display plinth. In the middle of the screen, imagine that is the buildplate of our printer, with an object on it.
On the left we have options allowing us to rotate, resize, reposition and so forth.
On the right we have a series more options such as how thick we want each layer to print (small number = finer detail, slower print time, higher number = more visible layer lines, but faster print), we can also change our infill in that we can make our object solid, but to save material we can change the density of the object by making it partially hollow saving material and time, whilst adjusting the design of the infill to add strength (much like a skeleton)
We also have many other options like adjusting print speeds and temperatures, as well as supports which we'll look at in a second.


So supports. What are they and why do I need them? If we look at our second picture of the Plinth here which I've reangled it to help demonstrate.
You'll see that suddenly a large portion of the object is now floating in the air which our printer will not be able to print, the software has also picked up on this and added the red to show we have a likely failed print on our hands. Supports are material built underneath these points to allow our object to have something to be built on. Our software can add this in for us although consider whether a simple rotation will correct the error as supports mean more material wasted and more time to physically print them. (Many models may not have an option that can avoid this. Luckily for us, The buildings in the City of Firwood set were designed not to require supports.
From here. We simply hit the slice button, our PC will have a think about things and turn your product into 10s, 100s maybe even 1000s of individual slices, it will then give us an estimation of how much material is needed and how long it will take to print. Please note the settings you select will have a HUGE difference on the times a print will take.
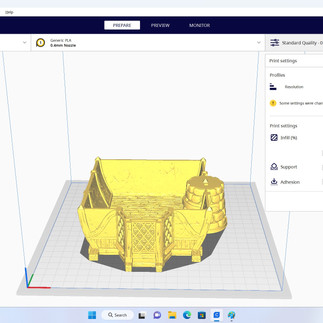
Remember in our last episode I said. A really really long time? The settings you select in the slicer will have a real world impact on things. Here is an example of the sliced version of the Weapon shops Ground Floor with a few minor changes in relation to quality and infill


Thats not a typo. Reducing the layer height to high quality, and moving the infill to make the walls more solid just increased the build time by a whopping 3 days. Thats non stop print time.
Now that we've looked at the rough process of Slicing, I'll add all the items of the build below so you can see the parts required to produce this building, and get a proper idea of the time it takes. As you can see, this building will take approx 1 week at a medium quality but broken up over several separate prints taking a bit over a day each.
Next stop. Save to the USB stick with the memory card in it that came with the printer, and off we go to the machine itself.
Enough stuff around..... Print Time
So the printer we'll be using for this is a Creality Ender 3 Pro. The main reason I bought this printer was its combination of great entry level price and good reviews, but also its so damn popular that you can find a youtube tutorial for just about anything you could possibly do with it.

For the purposes of our print, we insert the memory card into the slot at the front of the printer and turn it on. From here we move into the other of the top 2 most important parts of the process. Print Bed level (For a proper instructional, see Youtube... Haha What a cop out)
In basic though, we home the print head, disable the stepper motors so we can manually move it, and we will adjust the dials underneath, with a piece of paper in between the nozzle and the bed itself. We adjust until we can pull on the paper and it can come out with pressure, rather then being jammed in between the two, or so loose that our nozzle is too far away from the bed that the filament will not stick to the plate. (This will take a bit of trial and error to find the sweet spot, but gets pretty easy once you get the hang of it)
Once we've got our bed level correct its time to use the printer to select what file we are going to print and it will start heating up the nozzle and the build plate. Once they get upto temperature the printer will start the process and theres nothing left for you to do other then watch the print closely for the first couple of layers, and then periodically inspect the printer to make sure nothings going astray.
First couple of layers is particularly important to watch as if you are going to have problems with the bed level, your part no sticking to the print bed, or a major failure, this is typically when its going to happen.
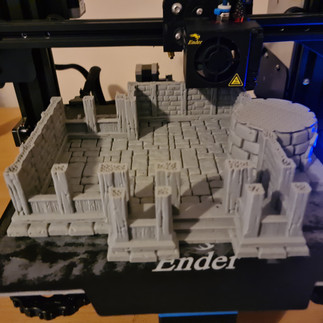
Also note, one of the pictures below is a close up of the roof tiles, I wanted to make sure I showed off the layer lines as this really is a key element of this style of printing and 1 of the main negatives. On a large terrain piece its not overly noticeable, but on a smaller curved object it is definitely something to consider. (This done on medium quality, so it can be improved)
Its always important you come back periodically to inspect your print, remember that if it starts to fail, this isn't a fancy contraction that'll automatically shut down. It'll just keep printing what it thinks is your product sending strands of plastic everywhere, which is always fun. Imagine the below image if I didn't check the printer for 12+hours (No, failures really aren't fun)
For reference, this is the type of failure incorrect level/poor bed adhesion or incorrect supports will produce

About a week later, all our components are printed, and put together. Here is the final outcome. Pretty happy with it and look forward to painting it up. Hopefully this has given you a chance to see the process from start to finish, not as an instructional, but as a guide to what you can expect from PLA/Filament printing.


Hopefully the above helps give you an idea of whether this hobby is right for you. 3D Printing is definitely something I think people should consider its own hobby. They can be troublesome, In the last year I have had to replace a hot end as well as the Filament feeder. Both are recommended upgrades on many Youtube vids so didn't come as a surprise.
I previously mentioned I was going to do a part 3 on Resin printing. Which may be coming in the future, but for now. Technical issues/Gremlins have gotten in the way so I'll have to delay that for down the track once I finish swearing at it.
Thankyou all for reading this one. If you have any questions, please reach out in the comments below.
Thanks.. Spooky Luke


Comments